
Using Entra authentication in Power Apps PCFs and client scripts
Following my last article about obtaining tenant ID and UPN in Power Apps, we are going to look into obtaining Entra ID tokens for calling APIs from your controls (or client scripts). This can be used for various scenarios - calling Microsoft Graph, your own API or even Azure Management one.
When interacting with Entra from client-side, you should make use of @azure/msal-browser package (or eventually @azure/msal-react which you can use in React directly). For the purpose of this article, we are going to create two PCFs (two different app registrations) which obtain tokens and call Microsoft Graph (but it could be any other API).
I suggest you start with the SAMPLE before going further, as this article is going to discuss only some of the specifics of the implementation.
Setting up the app registrations
In order to start with the PCF, you need to create an app registration. You should always consider using a separate app registration per PCF, and you shouldn’t re-use app registrations across different PCFs. It might seem easier in the beginning, because the SSO is going to be able to share and re-use the tokens, but when your controls start requiring different permissions (scopes), it is best to have it separate.
Once you setup your app registration, you need to enable it for authentication by adding a redirect URI. If you are building a single-tenant PCF which will be used within your organization, the easiest way might be to simply add your instance’s URI, eg. https://hajekj.crm4.dynamics.com/webresources/cc_hajekj.PCF.Msal1/popup.html and update it when necessary (an app registration can have many redirect URIs). If you are building a multi-tenant application, this is not a viable option.
What you can do instead is use wildcard URIs. Basically, it looks like this https://*.crm4.dynamics.com/webresources/cc_hajekj.PCF.Msal1/popup.html. You obviously should create one for each of the supported regions. Alternatively, if you want to follow the spec and aim for better security, you can build sort of a SSO redirector - this is a pattern used when signing in to Model Driven Apps, Azure App Service and more. Basically, you can build a service, say https://sso-redirect.contoso.com, use it as a redirect URI in the app registration, and then when initiating authentication via MSAL, add your own state containing the actual instance where you want to end up. Once the user gets to the SSO redictor, it looks into the state, verifies that the target is within your registered instances and if it is, redirect the request to its destination - but this is an advanced topic, and you shouldn’t need to do this for most scenarios.
In this case, we are shipping an empty HTML page which we use as the destination of the request. There are two reasons for that - origin - in order for MSAL to be able to get the result of the authentication it needs to be on the same origin - whether it is popup or hidden iframe, and performance - if you would redirect to /main.aspx or just /, the model driven app would start loading and there is a chance that the information passed in the redirect would get lost (MSAL periodically checks the iframe or popup for result), because when the Model Driven App starts loading, it manipulates window.location. If you don’t want to ship your own “dummy” page, you could use the /uclient/blank.html path which is used for Model Driven Apps iframes in script isolation (maybe more on that in another article), but the safest option is with your own page.
Single Sign On
The target result is that the PCF can easily authenticate the user without any harassment - eg. entering their password, and ideally in a silent way, so that the user won’t even notice anything.
Third party cookies
While the above target sounds really wonderful, due to the requirement of third party cookies, the seamless experience may not always work in all browsers (this is fairly live and discussed topic, so this article may not have the latest info).
So what you should do (and the sample does it) is always try the silent auth (ssoSilent) and if it fails fallback to another method.
In Model Driven Apps (or generally all embedded scenarios - where you are running inside someone’s runtime), you should fallback to popup method. The reason for that is that if you used redirect, the user could loose context of the window, it could result in an unsaved changes prompt etc. And in order to avoid the popup blocker, you should render a button (you can use openAlertDialog) which the user clicks and therefor avoids the popup blocker.
Additionally if your users are using Microsoft Edge with work account signed-in (tested on Windows only), it allows the use even with third party cookies blocked, because the authentication broker within Edge adds your users tokens into the header of the SSO request, which replaces the need for relying on third party cookies.
Nested App Authentication (NAA)
One solution to this would be the use of freshly added Nested App Authentication which was invented to specifically handle these scnearios. It allows the host app to broker tokens for the child apps rendered within. Unfortunately, this is only available in Microsoft Teams and some Office apps only.
Multiple tenants, guests and switching accounts
In 99% cases, you want the user to use the same account they used to sign-in to Power Apps. If you don’t deal with B2B guest users, you don’t have to care about it much, but if you want to support guests (and you should especially when you’re redistributing your PCF), the configured authority in MSAL should contain the current environment’s tenant ID (and you already know how to get it).
Next, you have to obtain user’s UPN for loginHint (again, you already know how to do it).
In order to check if the user has already signed-in, or you have their refresh token you can retrieve it via getAccountByUsername, the provided account can also serve as loginHint for MSAL. When getting the accounts from MSAL, you should always try to match the correct one to the current user.
Lastly, you should not use setActiveAccount and instead persist the selected account yourself, because the active account is shared across all MSAL libraries on the page and MSAL wasn’t really built to be run in multiple instances on the same page at the same time.
You can use this diagram for the implementation (but you want to skip some parts mentioned above).

React alternative
If you want to do this in React directly, you can using @azure/msal-react.
Approach in client scripts
If you want to do the same in client scripts (eg. app ribbon, or any other ribbon or on form etc.) you can do the same as above, except for rendering your open popup button, you must use openAlertDialog because you shouldn’t really access the DOM from client scripts.
You can also notice that Microsoft does the same thing when you open a Model Driven App with third party cookies disabled.
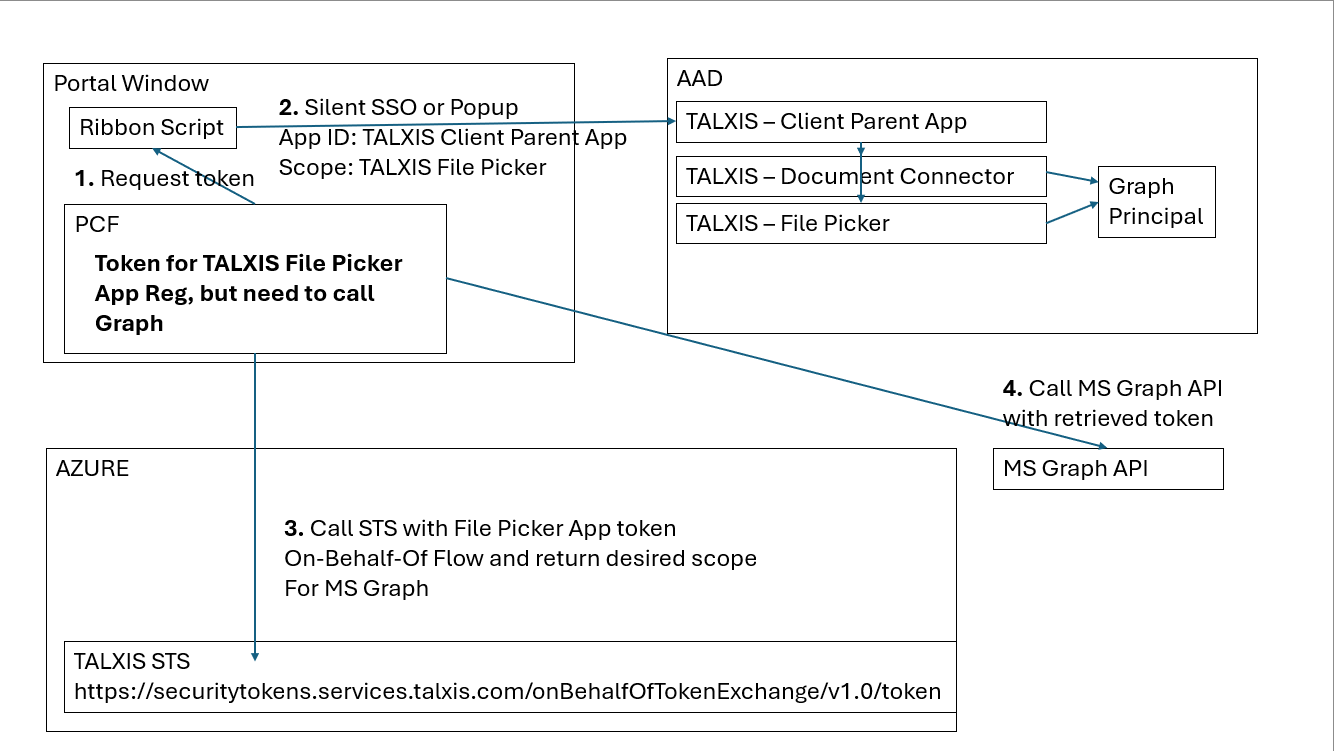
Advanced scenario with Token Broker
This is an advanced scenario, and if you want to know more, feel free to reach out.
Now if you have many controls on the same page, eventually some client scripts, you don’t want to spam the user with login popup prompts. One solution to that would be the use of NAA, but I don’t believe it’s likely to come into Power Apps, so the second best option is to create your own token broker, which does something like NAA.
This pattern is also what you have to do when building Microsoft Teams apps and it struggles with the same third party cookies problem.
Basically you add an authorized client application (the broker) to your PCF’s app registration. This tells Entra that when the broker requests a token for your app, it will work without explicitly being consented for.
So at this point, you get a token for your PCF (aud is your-pcf-app-id), but you can’t call Microsoft Graph (or any other API) with that! The next step is, that you need to exchange this token for the token for the target application. This is achgieved via On-Behalf-Of flow in Entra. This call however has to be done via backend, as it requires client_secret to be provided (Microsoft Teams reference).
Once you get the token back, you can call your resource.
Sample
The basic SSO with logic for obtaining the account, attempting silent SSO, doing the popup login and multiple controls per page is available on GitHub: https://github.com/NETWORG/sample-pcf-msal
It contains an app module sample, so you can simply just build the solution and import it to your dev environment (see the commands in README). The sample provides two client IDs, which you can change for your own, but for development purposes, you can use them, they are confured as multi-tenant apps, so as long as you are fine with consenting them in your tenant (they just have User.Read permission in Graph).
Note on canvas apps
An interesting question was raised on LinkedIn: How do you do any of this in canvas apps?
I haven’t tested any of this, it’s just a thought process. If you give this a try in canvas apps, please let me know how it went.
Well, canvas apps are different. They don’t share the same origin, they handle PCF differently (context especially), they load the PCF resources differently and through different origins.
My canvas app runtime appears to be using https://runtime-app.powerplatform.com/ domain, the authoring (maker) is using something like this https://authoring.eu-il109.gateway.prod.island.powerapps.com which is likely to be different per deployment island. And neither serves popup.html from your PCF.
Two quick solutions from the top of my head:
- You could technically build your own iframe or popup and then do a
postMessagewith the authorization response from it and pass it back to MSAL - the entire hash and handling it via MSAL’shandleRedirectPromise. - MSAL periodically tries to check the iframe/popup for the hash (if it’s on different origin, it return nothing, so it keeps trying). You could specify the redirect URI as
https://runtime-app.powerplatform.com/something-dummy-auth-redirect(you can get this value in the PCF) and while it responds with 404, the hash will be there and MSAL should pick it up. You could then do this dynamically via the SSO redirector mentioned in the blog in case it changes.
Option 2 looks probably most viable to me, combined with the SSO redirector, could be easy enough.
To submit comments, go to GitHub Discussions.